The HobbyKing Bixler 2 is a EPO foam plane designed for both those new to RC aircraft, as well as more experienced pilots looking for a stable platform for First Person View flying. The pusher-prop design allows the FPV and/or secondary flight camera to be positioned at the front of the airframe with an unobstructed forward view. Not having to film through a spinning prop saves the footage from being ruined by the rolling-shutter distortion which classically affects the CMOS sensors used in most small cameras.
Because of its broad target audience, the Bixler 2 requires substantial modification to be used as a dedicated FPV platform. The increases in gross weight due to larger batteries, cameras and electronics add a substantial amount of stress to the entire airframe, and particularly the wing loading. This stress is further exacerbated by the more powerful electric motor and longer propeller that are often needed to maintain acceptable performance with the increased weight and drag.
Modifications
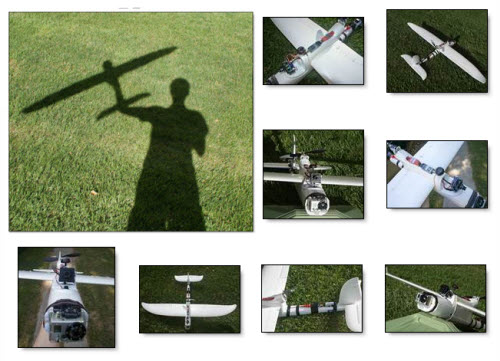
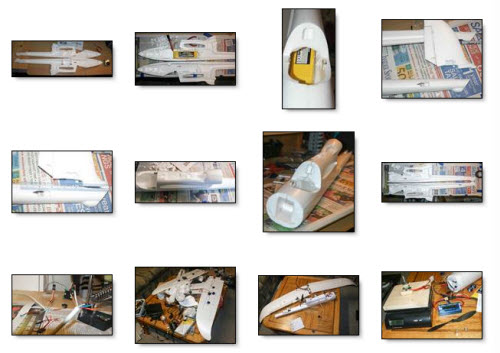
I referenced a number of forums and build logs when deciding how best to assemble and modify my Bixler 2 kit. Among these were RCGroups and FPV Labs, each containing almost too much information on different people’s experiences with the Bixler and its various iterations. My greatest inspiration came from a fellow blogger at bixler2fpv, whose overall design I chose to emulate. Along the way, I did my best to capture pictures of the plane’s construction:
Below, I have summarized a list of the mods I made to my Bixler 2:
- Permanently glued the wings on, allowing for removal of the bolts and tubes that spanned the fuselage and wasted space.
- Reinforced wing spar to handle extra weight – guled 2 additional carbon fiber rods (4mm hollow and 2mm solid) inside the stock 6mm hollow rod with gorilla glue.
- Relocated Elevator and Rudder servos to the rear – both to free up space in the main cargo area, as well as to shift more weight to the back and reduce the travel needed for the control linkages.
- Also relocated the RC receiver to the rear, for weight & balance reasons as well as to distance it from possible interference by the VTX.
- Moved the ESC and VTX outside the cargo bay and onto the top of the plane for better thermal management.
- Replaced the stock motor mount with the SmallParts CNC mount, allowing for 9×6″ propellers vs the stock 6×4″ size prop. Result: better cruise time.
- Removed the nose to mount the GoPro via a wooden mount screwed and bolted into the front bulkhead. GoPro attaches with velcro, and can be swapped out for the nosecone if desired (also velcroed). A sock around the mount prevents dirt from getting into the velcro. Foam between the wood mount and fuselage reduces vibration.
- Hollowed out the fuselage by removing all obstructions between the canopy and tail, allowing for a single 3S 5000mAh lipo or 2x 2200mAh batteries in parallel.
- Added packaging tape to the leading edge of the wing surfaces to prevent damage during hard landings.
- Glued velcro along the bottom of the cargo bay to prevent batteries (also with velcro) from slipping and altering the aircraft’s COG in flight.
- Rubber band to augment the weak canopy magnets. This also serves the purpose of securing my VTX and microphone.
Flight Characteristics
The extra 600g in weight was immediately apparent during the maiden flight. Hand launching was more difficult than with previous planes I have flown, and my first attempt ended up in the tall grass. Having two people made things easier, and the next 3 launches were successful. I’m hoping solo launches will be possible with additional practice.
Once airborne, the Bixler 2 lives up to its great reputation for stability and performance. I was unable to provoke any nasty stall / spin characteristics, and climb performance was very reasonable – although nowhere near being capable of sustained vertical ascents. Rolls were smooth and loops possible with enough speed – though not from level flight.
Slow flight performance was unsurprisingly less impressive than a lighter stock bixler would be capable of, although the flaps helped immensely. I still found myself wanting to be able to slow down a bit more, but I think that will have to wait for a Skywalker or similar 2 meter wingspan airframe. Top speed was measured by GPS at approximately 40mph.
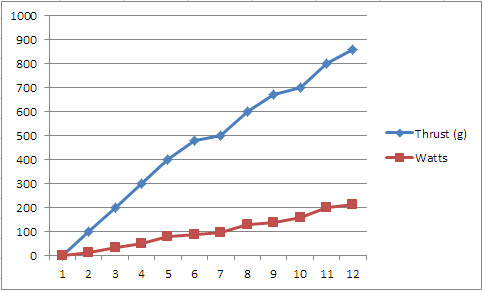
Bench testing of the power vs thrust.
The 1050kv Turnigy Park450 motor and 9×6 prop combo drew a maximum of 213 watts when I tested it on the bench, producing 860g of thrust. In the air, I noticed flight times of about 20min with 4400-5000mAh of 3S lipo battery capacity at 60-80% average throttle.
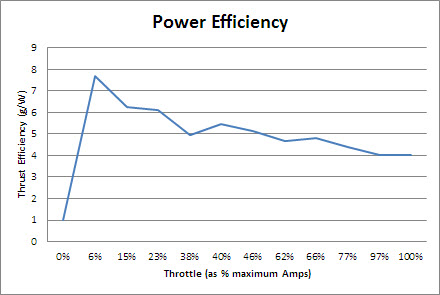
Cruise efficiency at various power settings, measured in grams of thrust per Watt. Throttle reported as a percent of maximum amps consumed.
Specifications
Below is a near-comprehensive list of the parts used in my Bixler 2 build. I re-used a motor and ESC already in my possession. If you are building this from scratch, I suggest the NTM Prop Drive 2836 2200KV if using the stock 6×4 prop (or the 35-36 1400KV with a larger 9×6 prop) and a beefier ESC to go with it. Note that when buying motors you often need to buy an accessory mounting kit and often a spare shaft is a wise idea. Nothing is worse than needing a $0.50 part and having to wait 3 weeks to get it from a warehouse in china.
| Price | qty | Item |
| $44.85 | 1 | Hobbyking Bixler 2 EPO 1500mm w/Optional Flaps (KIT) |
| $14.52 | 1 | Turnigy Park450 Brushless Outrunner 1050kv |
| $17.95 | 1 | smallpartscnc Bixler 2 Motor Mount |
| $12.19 | 1 | TURNIGY Plush 25amp Speed Controller |
| $0.80 | 1 | GWS EP Propeller (RD-1047 254x119mm) (6pcs/set) |
| $18.83 | 7 | HXT900 9g / 1.6kg / .12sec Micro Servo |
| $4.43 | 1 | Turnigy TGY-R5180MG 180 Degree Servo |
| $26.42 | 1 | FrSky D8R-XP 2.4Ghz Receiver (w/telemetry) |
| $270.00 | 1 | GoPro Hero2 |
| $45.00 | 1 | PZ0420 600TVL SONY SUPER HAD CCD Camera |
| $40.00 | 1 | FatShark 250mW 5.8GHz Video Transmitter |
| $35.00 | 1 | 5.8GHz Circular Polarized spiroNet Antenna set |
| $3.17 | 1 | FPV Fiberglass Pan-Tilt Camera Mount L-Size |
| $3.29 | 1 | 12v amplified mic |
| $2.99 | 1 | L-C Power Filter for FPV A/V Systems |
| $24.19 | 1 | ZIPPY Compact 5000mAh 3S 25C Lipo Pack |
| $17.98 | 2 | ZIPPY Flightmax 2200mAh 3S1P 20C |
| $5.21 | 1 | HobbyKing HKU5 5V/5A UBEC |
| $1.88 | 1 | On Board Lipoly Low Voltage Alarm (2s~4s) |
| $6.75 | 2 | 2mm CF Rod, 24″ |
| $8.98 | 1 | 4mm 40″ CF rod |
| $5.75 | 1 | Gorilla Glue, 2oz |
| $21.36 | 1 | Cat6 Molded Patch Cable, Grey (35′); Shileded pairs |
| $60.00 | 1 | Estimated Shipping costs |
Performance
Additional performance information:
| Wingspan | 1500mm |
| Material | EPO |
| Length | 963mm |
| Cabin space | irregular |
| Wing Area | 26.5 dm2 |
| Wing loading | 54.7g/dm2 |
| Thrust | 960g |
| Empty weight | 900g |
| Maximum takeoff weight | 1600g |
| Maximum useful load | 700g |
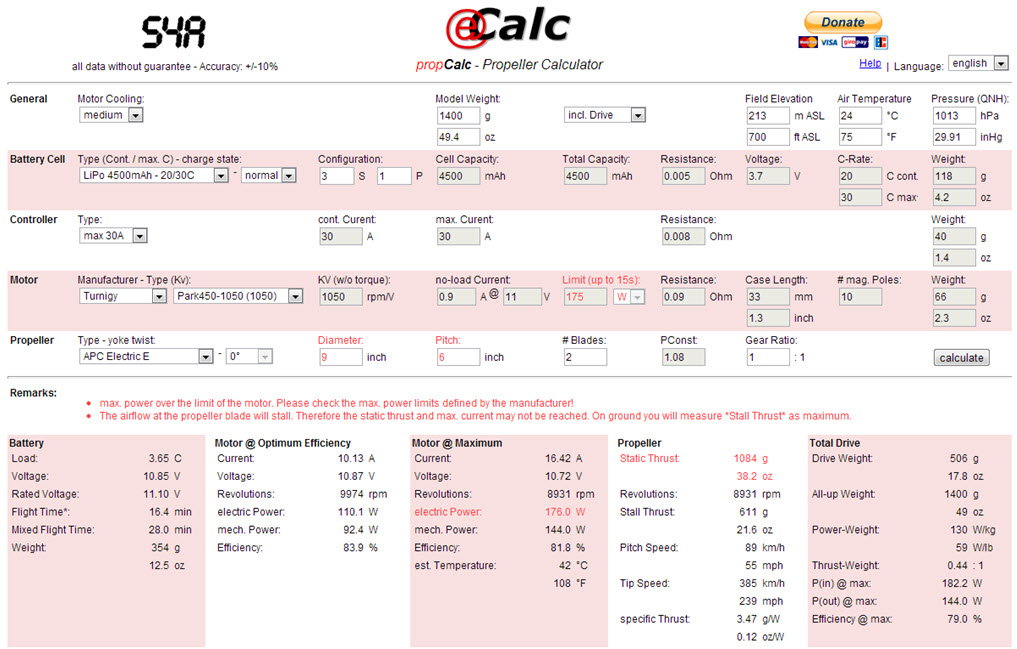
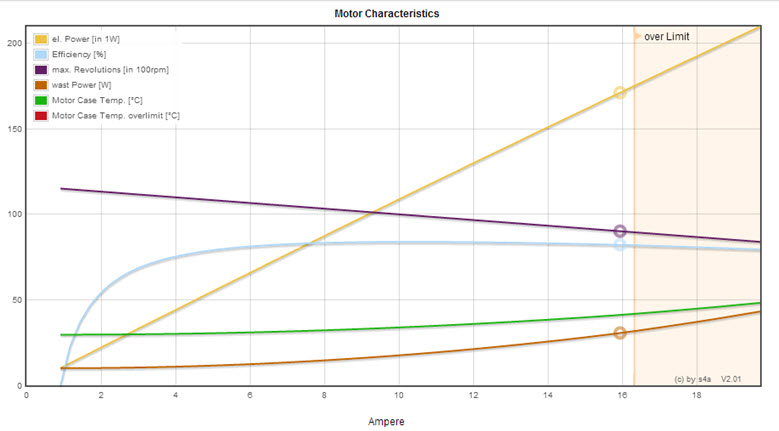
PropCalc data – http://www.ecalc.ch/motorcalc.htm?ecalc&lang=en
The video footage I captured showed no evidence of vibrations, though between the wind and my novice flying, it wasn’t a product I’d be in any hurry to publish. I also learned why many fly with naked GoPros – ie. not using the protective case. In addition to the weight savings, I suspect fogging of the lens may be the real motivator. Due to substantial temperature changes with as little as a couple thousand feet of altitude, fogging is a real issue – and one that ruined my already lackluster video from the GoPro. Fortunately, the PZ0420 camera which I used to actually fly the plane had no issue. Future flights will see the use of newly-purchased anti-fog inserts inside the GoPro case, which should hopefully resolve the issue.

Simon
September 13, 2013 at 8:11 am
Hi, great read. Nice inspiration for my first fpv plane, probably a sky surfer or bixler. GL&HF in future endeavours!
MarkJ Willia
December 21, 2013 at 11:22 am
I notice that ecalc is showing the max current draw for the motor above the maximum recommended. I have bought the same prop & motor combination for my Bixler 2. Have you experienced any problems with this set up? Thanks for the blog posts on this though, there’s some great info in here 🙂
Innominate
December 21, 2013 at 2:23 pm
It was only 1W over the 175W limit – I had no issues. Good luck on your build! Are you flying FPV?
MarkJ Willia
December 23, 2013 at 8:29 am
Cool. I’m not flying FPV. I’m using APM with a camera to map vegetation and topography. The load on the aircraft is reasonable at the moment so hopefully it will all be ok.
Innominate
December 23, 2013 at 3:33 pm
Interesting, I had considered something with similar capabilities when first deciding on parts. I assume you’ve heard of Flight Riot? Looks like he’s made quite a bit of progress this year:
http://flightriot.com/uav-mapping-using-chdk-visualsfm-and-cmpmvs-skywalker-air-frame/
MarkJ Willia
December 26, 2013 at 2:45 pm
Ah this looks good. I’ve been watching his videos on YouTube. I hadn’t seen this I shall try and follow this. Thanks 🙂
bryan flake
March 27, 2014 at 11:12 am
I am creating a satirical spaghetti western type of home movie. I want to include stock footage video of old west shots. I want to capture shots with horses and cows etc. Is there a database for stock footage that I can peruse?
bryanflake1984| http://www.stockfootage.com/?s=cityscape&post_type=product
mterzian
July 21, 2014 at 8:01 am
Thank you so much for taking the time to gather all these information!
I’ve read about so many different mods on so many different forums/blogs, that can’t even remember which was where.
Reading build logs and mods is probably the best way to remain patient while waiting for HK delivery 😉 (along with practising on simulator)
My Bixler should be arriving soon and I’ll apply most of the mods you’ve listed.
Thanks again!
Mathieu